June 30, 2026
How to Add Variable Products in WooCommerce (Step-by-Step Guide)
If you sell anything that comes in sizes, colors, or options — t-shirts, phone cases, coffee bags, you name it — you need variable products. It’s the WooCommerce product type that lets one product page offer multiple versions, each with its own price, stock count, image, and SKU. It’s also the product type that confuses more store owners than any other, because setting one up takes three separate steps that WooCommerce never quite explains in order.
Here’s the whole process, in order, with the gotchas flagged. Fifteen minutes and you’ll have it down for good.
The three-step mental model
Every variable product is built in the same sequence:
- Attributes — define the options that exist (Size, Color) and their values (Small, Medium, Large).
- Variations — generate the actual combinations customers can buy (Small/Black, Medium/Black, and so on).
- Variation details — give every combination a price, and optionally its own stock, image, and SKU.
Most “my variable product isn’t working” problems come from skipping or rushing one of these three. Keep the sequence in mind and the rest is just clicking.
Step 1 — Create the product and switch its type
Go to Products → Add New. Give the product its name, description, product images, and categories like you would for any product. Then scroll down to the Product Data panel and change the dropdown from “Simple product” to “Variable product.”
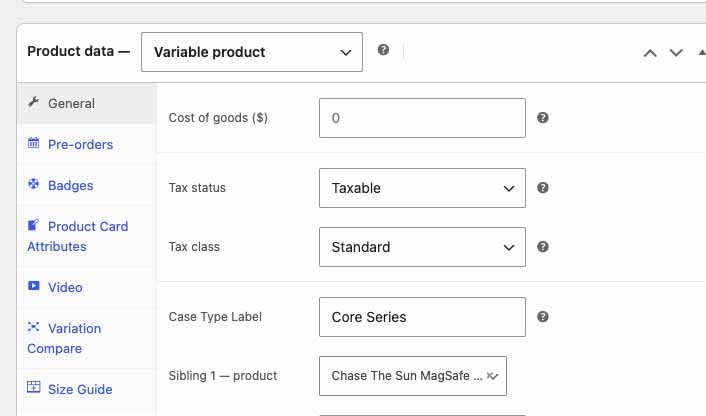
You’ll notice the General tab’s price fields disappear. That’s expected — on a variable product, pricing lives on each variation, not on the product itself. We’ll get there.
Step 2 — Add attributes
Attributes are the option types: Size, Color, Material, Grind, whatever applies to your product. Click the Attributes tab in the Product Data panel.
Global attributes vs. custom attributes
You have two ways to create attributes, and choosing right here saves you pain later:
- Global attributes are created once under Products → Attributes and reused across your whole catalog. If more than one product will ever share the option — and Size or Color almost certainly will — use a global attribute. They also unlock layered navigation filters (“filter by size” widgets) and keep your data consistent.
- Custom (product-level) attributes are typed directly into a single product and live only there. Fine for a truly one-off option, but if you find yourself typing “Small | Medium | Large” into a second product, stop and make it global.
Attaching the attribute to your product
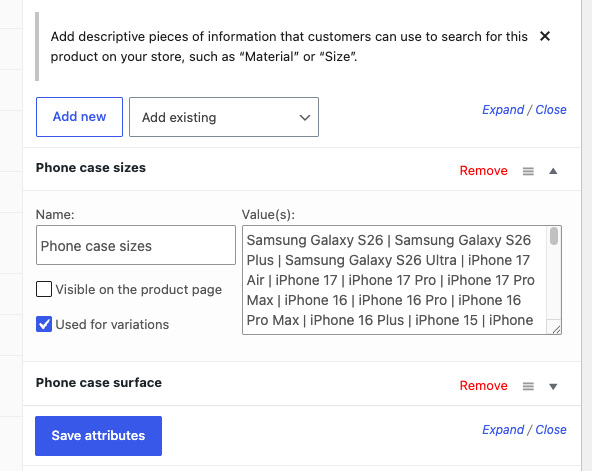
On the product’s Attributes tab, pick your global attribute from the Add existing dropdown (or click “Add new” for a custom one). Then:
- Select the values this product actually offers — click into the value field and choose the terms, or hit “Select all.”
- Check “Visible on the product page” if you want the options listed in the Additional Information tab.
- Check “Used for variations.” This is the checkbox everyone misses — without it, WooCommerce treats the attribute as descriptive text and you won’t be able to create any variations from it.
- Click Save attributes.
Step 3 — Generate the variations
Click the Variations tab. You can add variations one at a time, but don’t — click “Generate variations” instead. WooCommerce creates every possible combination of your attribute values in one shot: three sizes × two colors = six variations, done.
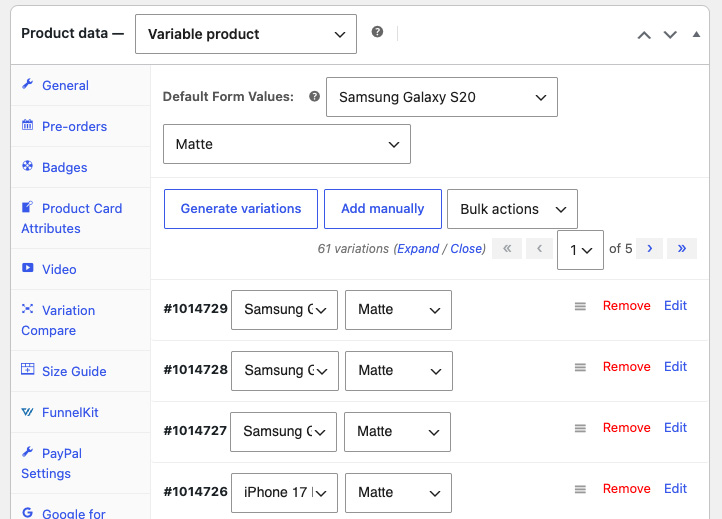
Sell most combinations but not all? Generate everything, then delete the two or three combos you don’t offer. Faster than adding manually, and you can’t accidentally miss one.
Step 4 — Set a price on every variation
This step is not optional: a variation without a price will not appear on your storefront. No error, no warning — the option just silently won’t be purchasable. This is the single most common reason a variable product “doesn’t work.”
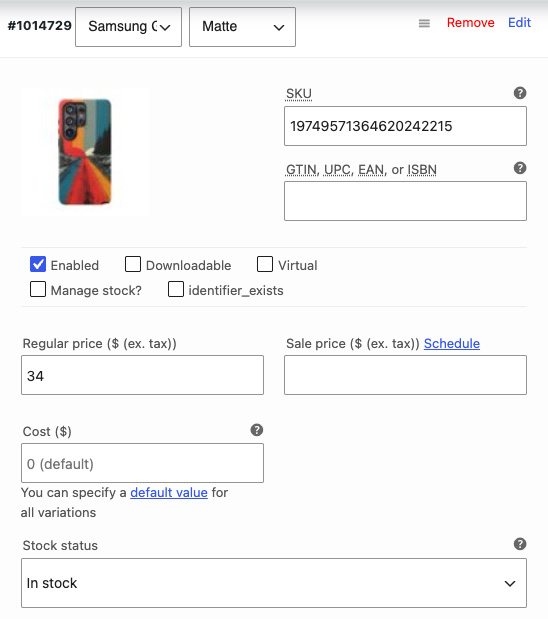
Click a variation to expand it and fill in the Regular price. If everything costs the same, don’t do it six times — use the bulk tool: the dropdown at the top of the Variations tab has “Set regular prices,” which applies one price to every variation at once. Same menu handles sale prices, stock, and more.
Step 5 — Per-variation details worth setting
Each expanded variation has its own set of fields. The ones that earn their keep:
- Image — click the image placeholder on the variation to assign one. When a shopper picks “Red,” the product photo swaps to the red version. Huge for conversion on anything visual; skip it and the main gallery image stays put.
- Manage stock — check “Manage stock?” on the variation to track inventory per combination. If you have 10 Smalls and 2 XLs, this is the only way WooCommerce knows the difference. Leave it unchecked and stock is tracked (or not) at the parent product level only.
- SKU — give each variation its own SKU (e.g., TSHIRT-BLK-M). Your future self doing inventory, and any shipping or feed plugin you add later, will thank you.
- Weight & dimensions — if variations ship differently (a 12oz bag vs a 5lb bag of coffee), set them per variation so shipping rates calculate correctly.
- Description — an optional short note that shows when that variation is selected (“Runs small — size up”).
Step 6 — Set default selections
At the top of the Variations tab you’ll find Default form values. Set these to your most popular combination — Medium/Black, or whatever moves. With defaults set, the product page loads with options pre-selected, the price visible, and the Add to Cart button live. Without them, every shopper starts from blank dropdowns and an unclickable button. It’s one small setting that measurably reduces friction.
Step 7 — Check it on the front end
View the product like a customer. Confirm: every option combination you sell is selectable, the price updates as you change selections, the image swaps if you assigned variation images, and Add to Cart activates once a full combination is chosen. Add one to the cart and make sure the right variation name shows in the cart line.
Troubleshooting the usual suspects
A variation isn’t showing up on the product page
Nine times out of ten it has no price — set a Regular price on it. Otherwise check that the variation exists on the Variations tab, isn’t set to “Out of stock” with hidden out-of-stock items enabled, and that you saved changes.
The Variations tab won’t let me add anything
The attribute isn’t flagged for variations. Attributes tab → check “Used for variations” → Save attributes → back to Variations.
“Any Size” / “Any Color” — what does that mean?
A variation set to “Any” for an attribute matches every value of it — useful when only one attribute changes price (sizes priced differently but all colors the same, say). Powerful, but confusing when set accidentally: if selections seem to match the wrong variation, check for unintended “Any” values.
The price shows a range like $18 – $24 and I don’t want that
That’s WooCommerce’s default when variations have different prices. It resolves to the exact price once options are selected — and setting default form values (Step 6) means most visitors see a single price immediately. Fully replacing range display is a code-snippet job.
Stock isn’t counting down when variations sell
Stock has to be managed at the variation level for per-combination counts: expand the variation, check “Manage stock?”, enter the quantity. Parent-level stock management treats all variations as one shared pool.
I changed my attribute values and now variations are broken
Renaming or deleting attribute terms orphans the variations that used them. After changing global attribute terms, revisit affected products, regenerate or fix the orphaned variations, and re-check prices.
A few habits that pay off long-term
- Keep attribute counts sane. Combinations multiply fast — 5 sizes × 6 colors × 3 materials is 90 variations to price and manage. If you’re generating more than a couple dozen, ask whether some options belong as separate products instead.
- Name SKUs in a pattern (PRODUCT-COLOR-SIZE) so exports, feeds, and inventory scans stay legible.
- Set weights and dimensions on every variation from day one — accurate product data is what makes live shipping rates, return labels, and marketplace feeds work without surprises.
- Assign variation images for anything visual. The image swap on selection sells more than any product description tweak.
That’s the whole system: attributes define the options, variations are the buyable combinations, and every variation needs a price. Get the sequence right once and every variable product after this takes five minutes.
Running a WooCommerce store and want this stuff handled for you — the products, the site, the ads, the whole machine? That’s what we do, for a flat monthly fee. Tell us about your store and you’ll hear back within one business day.
